11.11.2012

Cactus cuttings 101

Crazy cactus lady strikes again! 


Three years ago, I plucked a tiny euphorbia trigona stem from a gorgeous specimen in a catholic church (sinner!!) after my nephew was baptized. I couldn't help myself! Now that little cutting is 5" tall and on its way to greatness. 

Last Tuesday while casting my ballot for Obama, I spotted a potted Opuntia Elata giving a valiant effort to thrive in a cramped corner (right next to the heat vent, poor thing) of the school library. I quietly wandered over to it and gently snapped off one of its larger pups. Stealing property from an official voting place? Probably illegal, but that's how hard-core I am. 

It seems as though I know what I am doing in the stolen-cactus-cutting department, so here are some tips if you aren't exactly well versed in the subject, and want to grow some free plants. 

First, let your cutting dry in a warm, bright spot where it won't be disturbed for at least 2 days and up to a week on a clean, dry surface like a towel. This will help the cut end heal over and give the plant the best chance to root. 

Next, find or buy a small 2" terra cotta pot and place a scrap of paper (I like unbleached coffee filters or newspaper) over the hole in the bottom to prevent your soil mixture from leaking out. 


For cacti and succulent cuttings, your soil mixture should consist of about 50% sandy gravel and 50% store-bought cactus potting mix. The gravel and sand will help improve drainage so the cutting does not rot, and the soil provides nutrients. If your mixture is very dry, lightly spritz it with water to moisten. 

Lightly pack the mixture into your pot, leaving about 1/2" from the top. Using a wooden skewer or pencil, make a shallow hole big enough for the base of the cutting. 


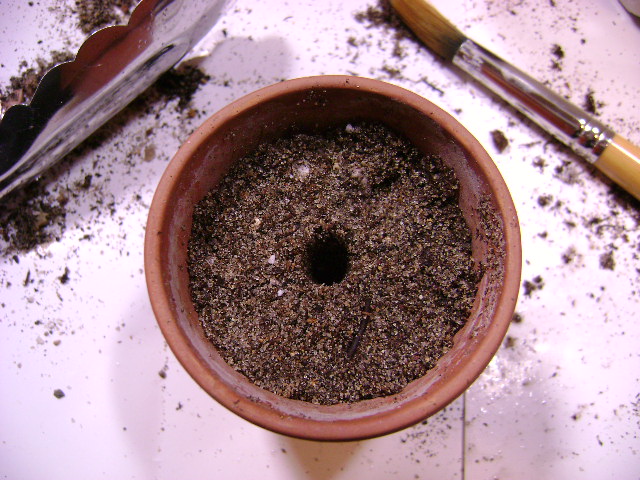
Place the cutting (cut side down) into the hole far enough 
for it to stand up on its own, and fill in the hole with the
 surrounding soil mix. 


I like to use a fine gravel (found at any garden center) topdressing for my cuttings to help prop them up and wick away moisture from the base of the plant. If your soil mix is sufficiently moist, you can wait to water your cutting until a few days after to ensure it will not rot. 


Place your new plant in a warm spot with sufficient natural light and it should root within a couple weeks. Don't be alarmed if the little guy starts to shrivel, he will plump up once his roots start to develop. My cactus cutting will be babied for the next 2-3 years, until I'm sure it is well-established and likes what I'm doing for it. 


10.27.2012

Grow!

Surveying my large plant collection, I got to thinking about the upcoming winter and the dismal lack of sunlight we get here in Wisconsin. It is apparent I do not have enough window real estate to satisfactorily sustain my brood. So, my next option seemed to be grow lights. 


I got myself to Menards (our local home-improvement store) and bought two full-spectrum 60-Watt light bulbs and two clamp lamps and voila! grow light central. The beautiful shelves you see in the photo below were newly installed in my studio the day before.  


I had two nifty wooden wine crates laying around which became the surface for the plants to sit on, and also holds such plant-growing necessities as watering cans, fertilizer, soil and gravel. 


I think it looks like a lovely little oasis. I hope this helps my plants thrive a bit more over the long winter. 
P.S. this is only a small fraction of my entire collection. So what? It's not a problem if you can admit to it...

9.12.2012

Matt and Bobbie's House::::::: Part 2:::::::


BEFORE: the living room wasn't in real dire need of rehab, but the sloppy paint job, dirty & rusted vents, pheasant and evergreen light switch covers, and old front door begged for some love. 

 We had new doors and windows installed throughout the house which helped matters immensely. Some nice bright white paint freshened things up and we spray-painted all the vents. 

Is this the same place? Hard to believe, I know. The hardwood floors through the whole house were worn and dirty. Step one was to rent a floor cleaner (a small version of what janitors use on gym floors) with a scrubbing pad and along with some hot water and special cleaner, we got these babies clean in one day. 

Step two was to sand lightly with a small hand-held power sander to even out the surface and remove superficial marks and scratches. We could have used a large floor sander, but didn't want to ruin the floors since we hardly knew what we were doing. 

Step three: apply one even coat of Golden Pecan Minwax stain. I was amazed by how the stain brought out the character in the wood and just made it glow. 

Once the stain was completely dry (I waited 24 hours to be sure) two coats of polyurethane went on to seal and protect and give even more silky glow and gorgeousness. 


Hmmm...I don't remember that sofa from before. That's because I just bought it! Yes, it hung 3 feet out the back of the Jeep, tied in with 10 feet of rope but I would have carried it on my back if I had to. For $100 at the thrift store, it is exactly what I have dreamed of finding for our new house. It had some ugly brown wood arms but a quick swipe with my jigsaw and they were adios. Hello, gorgeous. 

 Our Expedit now serves as room divider so the front door is not as visible from the living area. 


 The once-pink guest room now looks fresh and delicious. There are still lots of things to unpack, including art, so the pretty white walls remain blank. 


This is the air return vent in the hallway. Completely coated in a thick layer of dust. Enter ShopVac and spray paint. Fixed. 


I will be sharing more as we get more done and continue to have fun with our home. There is an entire upstairs we have grand plans for, as well as the bathroom and my studio. 

I would be remiss not to mention and thank those who have been generous with their time and helped us immensely. My sister put it several solid weekend's worth of work getting a lot of painting done (which I soon grew too tired of), along with my mom who labored over the filthy bathroom floor and in the yard chopping down a forest's worth of weed trees. My amazing in- laws have been more than generous working on anything and everything we needed help with, as well as a much-appreciated shopping spree at Menards.  We are so lucky to have our amazing family. Love you guys, and "thanks" is never enough!!

Matt and Bobbie's House

What an adventure the last 3 months have been. We now inhabit our very own home! It's an amazing feeling and I can't believe everything we've done to get to this point... The house hunt began early this spring and after looking at numerous foreclosures with crumbling foundations in questionable neighborhoods, we found our gem. She met every point on our wishlist: 3 bedrooms, charm & character, small yard, basement & garage, hardwood floors with lots of windows in a great area of town. We quickly put an offer in and soon after it was accepted. Then the hard part came. We spent weeks and weeks dealing with our lender getting through the rigmarole and red tape of a renovation loan on top of a first-time home buyer's mortgage. So, after pushing the closing date back about 3 times (and having the seller threaten to pull out of the deal), we finally got the keys. 

The house has great solid bones, but needed a lot of updating and TLC. Let's start with the kitchen, shall we? 


BEFORE: Lots and lots of very badly applied yellow paint. 

 The cabinets are Harrison metal cabinets, most likely original to the house c. 1950. What ever will I do with these....? Stay tuned. 

 One thing we quite liked was the faux brick back-splash behind the sink. 


 But it needed some help. 


More yellow in the dining area.The windows were also very decrepit and barely opened. Note the cute milk door which we will keep as a nod to the era the house was built. 


I originally wanted to take down all the cabinets and put up some simple open shelves. Matt talked me out of it, and so began the long arduous task of making over the lovely rusted, filthy metal cupboards and doors. 


Choosing the paint colors early on gave me the motivation to see this project through.

 Like I said, these babies were disgusting. That is indeed rust you see beneath the sink, and I was even lucky enough to find some mouse poop in one of the drawers. 


Dinner party, anyone?

 I spent hours and hours scrubbing, priming and painting the cabinets. We did take down one section to make room for the stove and fridge (not pictured) which saved me a good bit of work. 

Once clean and after a light sanding, I primed the drawers, doors and cabinets with KILZ spray primer, putting an extra coat on the super-nasty parts. I decided to paint just the very front of the drawers and doors with my funky colors of enamel matte-finish paint, to give them a more modern look. 


We love this utilitarian metal shelving (I used a lot of it in my art studio at the apartment) easily purchased at Home Depot or Target. This will serve as some extra storage & counter space and will eventually sport butcher block once we venture to Ikea. I am also looking forward to hanging open shelving above to display our coffee cup collection and other attractive kitchen kitchery. 

Wow! All that sweat and elbow grease was so worth it! The colors are so lively and cheerful, yet modern and Dwell-worthy. I still have DIY cabinet pulls to install (you can get a glimpse of them on the drawers to the right in the photo above). 
To rehab the back-splash, we simply replaced the broken and missing bricks (there was a whole box of them in the attic), painted the same white as the walls, and caulked the gaps and cracks to give it a finished look. 


The little eat-in area in the kitchen is the perfect size for our table. I like that it butts up to the window, as my plants get great morning light here. 

Still to do in the kitchen: 
* Get new counter tops (butcher block from Ikea)
* New faucet
* New flooring (possibly the new peel-n-stick tiles that can be grouted) 
* Window treatments (natural woven bamboo blinds)
* Garbage disposal 
* Hang open shelves

...And that's just the kitchen! Luckily, the rest of the house wasn't in such bad shape, so we'll cover that in the next post. That's all for now, I'm off to enjoy my house!


7.09.2012

String Art


 Prints and paintings are great, but sometimes you want to mix up your wall decor. What could be more sassy than some geometric DIY string art? 


Every aspect of this project was tedious and time-consuming. From drawing the template to pounding 200 nails, then applying the string, and finally carefully peeling off the paper template from under the finished piece. A full-on weekend project for sure, but well worth it. 


I chose dark brown, gold, grey, bright orange and dark rusty red embroidery floss. Any type of string or yarn would work, depending on the intricacy and boldness your design. Next time I'd like to try a rustic slice of tree stump rather than the pale plywood. 


While we're at it, check out my new thrifty finds:  
Left to Right: a cool volcanic textured pot, chevron planter, and circle-clad vase. Lots of brown-town, but I love it.

6.05.2012

Thrifted Lotte Lamp

This is going to sound crazy, but over the weekend, I found a Lotte Lamp (classic Scandinavian mid-century modern) for $5 at a thrift store. As you can see, there is nary a chip or scratch on the thing; it is either new or has been sitting in a closet for the past 40 years.  


The shade was only $2, so I bought it, even though I would like to snag an original Lotte shade at some point. A few years ago, I splurged and bought a brand new Lotte Lamp for $145 at The Century House here in Madison. They are fantastic. 


Who loves and amazing find? I do!

5.29.2012

Busy B

Here I am! I've been all kinds of crazy-busy getting ready to move into our new house (whaaat? more on this later) and to a lesser extent crafting and the other usual ridiculous things I tend to do. 


I am freaking out over warm colors. I found the fabric that is now wonderful pillow cases on a recent thrifting trip. 


Look at all the plants I have crammed in one place! Normally, these fellows would be outside by now, but as I mentioned we are moving in a matter of weeks, so they will have to stay put. Did you know Matt and I are buying a house? Big step in life! We are excited, overwhelmed, perplexed, frightened, and overjoyed. We've been thinking, dreaming and planning for this for a long time and it's really here--yikes! Look for a possible home-renovation blog in the near future!


Continuing on the warm color palette, I whipped out these pillows yesterday. I modified the fabric you saw above by folding and stitching it to create a varied design. The zig-zag is part of a remnant I've been saving for just the right project (read: hoarding and petting it while repeating "my pretty...")


For Mother's Day I tried my hand at the Succulent Cupcakes project featured in my previous post. I'd say the results were pretty damn cool. Everyone loved them. 


Time-consuming? Yes. Completely impressive and too-cute-to-eat? Also yes.